Hi Guys, In this post I will show you that how you can add a LVM partition in your Linux system. LVM have great flexibility over general partition types.You can easily manipulate, manage , add , remove, extend the partition even you can merge two disk partitions with in a single LVM partitions. however there are some drawbacks using LVM. One big disadvantage of using LVM is that it makes system slower up-to 40% and It creates complexity when disks gets corrupted.Its better to use LVM partitions for storage purpose not for system partitions.Below I have explained step by step that how you can create LVM partition.
Adding New Disk or Check Free Space In Existing Disk
First of all you have to check the free disk space available in your existing disk. For this you can run below command in your Linux system.
lsblk >> For all mounted disks
or
lsblk /dev/sdX >> (replace X with disk letter)
 |
| checking free space in your disk drive |
If you don't have enough free space in your disk to create a new partition then add a disk. Below is the screenshot of virtual machine in which I am adding a new disk. First shutdown your machine > select your virtual machine > open setting option > select storage > on storage device , under Controller SATA > click the + sign of disk storage > create the new disk > type the size > ok .
Once you sure that you have enough space to create a new partition, we can go further for next steps.
Create Partitions In Your Disk With LVM File System
Below are the steps in order to create a new partition with your existed mounted disk or in new drive. Below example is for new drive.
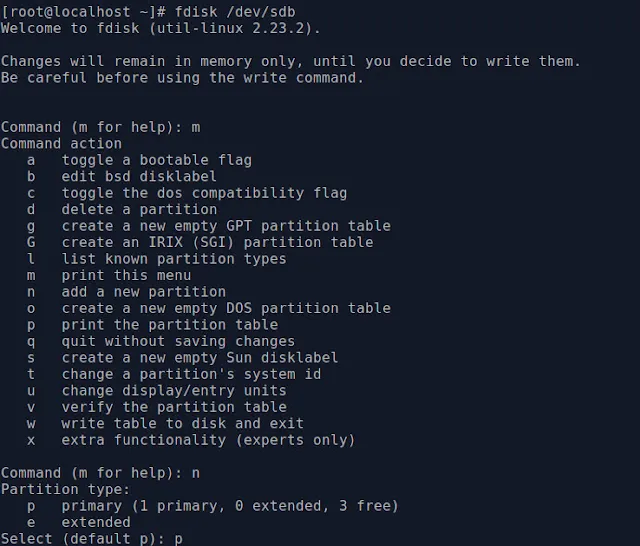
i) fdisk /dev/sdb
ii) press m for menu
iii) press 'n' key for new partition
iv) select option 'p' or 'e' from keyboard , where p is for primary partition and e is for extended.
Note: Linux can support only four primary partition for MBR partiton table & 128 primary partitions for GPT table.
 |
| creating partition with fdisk |
v) type the partition number or just press enter for default value.
vi) type the first sector value or just press enter for default value.
vii) type the last sector value or you can type the required size for your partition.
For example: +500M will create new partition with 500MB space. use G or K in order to create size in GB or KB.
viii) once you hit enter , now press 'w' to write the change into disk.
 |
| creating partition with fdisk |
Change Your Disk Partition Type Linux To LVM
In order to create LVM partition first we have to change our disk partition type Linux to Linux LVM , use below commands to change the partitions to LVM.
i) fdisk /dev/sdX (replace X with your disk letter )
ii) Press 't' to change the partition type
iii) Select your partition number ( remember (v) line of previous step )
 |
| creating partition with fdisk |
iv) press '8e' in order to change your partition to LVM or you can press 'L' in order to check the list of all partitions.
v) press 'w' key to write the changes to system.
 |
| creating partition with fdisk |
Now you have successfully change the partition type. you can check the changes by command fdisk -l /dev/sdX
 |
| checking disk partitions |
Creating Physical Volume: After creating the LVM partition successfully now we have to create the physical partitions for our LVM. Follow the below steps to create physical partition.
i) run command as show below
pvcreate /dev/sdXN (change the X with the drive letter and N with the partition number )
 |
| creating PV |
as you can see in above picture that I have create two physical volume together. if you also have create two LVM partitions you can also do the same.
ii) run the below command to check if we successfully created the physical volume or not.
pvdisplay /dev/sdXN(change the X with the drive letter and N with the partition number )
Now we can move to our next step.
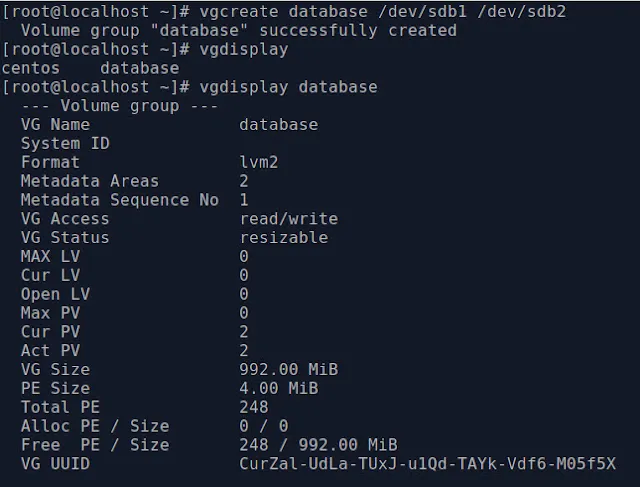
Create Volume Group: Now we have to create a volume group for our LVM. run the below commands to create volume group. you can give any name for your volume group.
i) vgcreate "name of the group" /dev/sdXN (change the X with the drive letter and N with the partition number )
ii) Check the volume group created successfully or not with below command.
vgdisplay "name of the group"
Create Logical Volume: Now we have to create the logical volume partition where we will actually save our data after mounting that. run the below commands to create logical volume for LVM.
i) lvcreate
-L 500 -n 'name of LV' 'name of your VG' ( where -L for size in MB , -n option for name of LV)
This command will create a new logical volume with 500M & with given name.
ii) To verify our LV run below command.
lvdisplay 'name of LV'
 |
| display the LV info |
i) mkfs.xfs
/dev/name of VG /name of LV
 |
| format LV with mkfs command |
Temporary Mount :
i) First create a folder where you want to mount your LVM partition or use the default /mnt path with below commands.
-mkdir /path/to/create/a/folder
-mount /mnt
ii) Then mount the partition to that folder or path.
mount /dev/volume_group_name/logical_volume_name /path_to_mount
| mount LV under /mnt for temporary |
Permanent Mount:
i) run command : blkid It will show the block id for the mounted devices
ii) copy the UUID of mounted logical volume.
iii) open the /etc/fstab file with any text editor e.g vim, nano. and add the below entery in it.
UUID=7acc701c-030f-4559-ae2d-0d4dac78b7e9 /mnt xfs defaults 0 0
- Where UUID code copied from blkid
- /mnt is folder path where we are mounting that LVM partition
- xfs is the file system type
- default is for mount option
- 0 for dump check disable
- 0 for file system check disable
iv) save the file.
 |
| last line entry of LV in fstab file last |
v) Now active the mount partitions with below command
mount
-a
activate all partitions which you just mounted
partprobe
to update kernel with partition info
vi) verify the mounted partition.
 |
| logical volume /database-storage has been mounted under /mnt folder |
That's All
Sharing is Caring 😊


0 Comments