


Please Read This 👇🏾

In this post I will show you that how you can add your Gmail account to any email client like Thunderbird or Outlook in your PC. Even if you have enabled Two Factor Authentication on your Gmail account. With this guide you can easily setup your email client for Gmail.
Please follow the below steps in order to configure Outlook/Thunderbird for your Gmail
Enable POP / IMAP Setting :
i) Login to your gmail account on web browser.
ii) Click on gear icon at right side of your gmail tab in web browser. Then click on see all setting option.
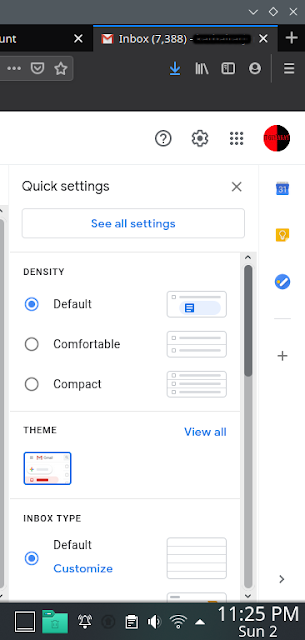
iii) Now click on Forwarding& POP/IMAP option.
iv) Scroll down and find IMAP access option. We will configure IMAP for this guide because in this way a copy of our emails will remain on your gmail account.

v) select the Enable IMAP radio button in order enable setting.

vi) There are some more option that can be use to setup the way how email downloads to your client mail box. Setup accordingly & then click save changes.
Setting For Email Client
i) Login in to your Google Account page.
ii) Select Security option.

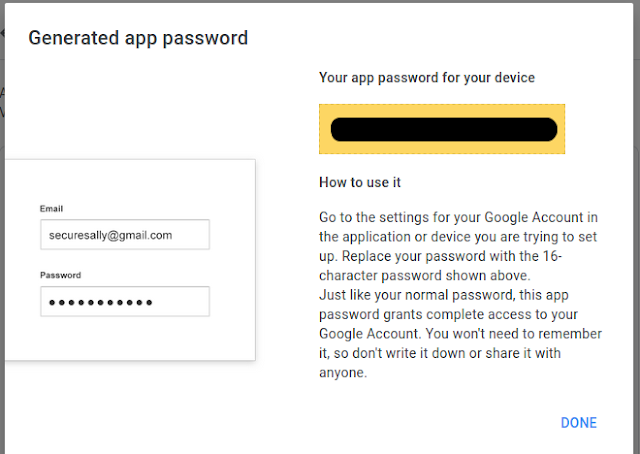
iii) Open App password option.

iv) In select app option select mail.

v) And in select device option select your device type e.g Windows, Mac, iPhone etc. If your device type not found , select other and type your device , OS type.
 vi) Then click the generate button. This will generate the a specific password for that device. Copy that password on clipboard or save somewhere.

vii) Now open your email client e.g Thunderbird or Outlook ( 2010 ,2013, 2016, 360). Here I am giving you a demonstrate on Thunderbird application
viii) You will be prompted to configure your email account. if not prompted select email option.

Enable POP / IMAP Setting :
i) Login to your gmail account on web browser.
ii) Click on gear icon at right side of your gmail tab in web browser. Then click on see all setting option.

iii) Now click on Forwarding& POP/IMAP option.
iv) Scroll down and find IMAP access option. We will configure IMAP for this guide because in this way a copy of our emails will remain on your gmail account.

v) select the Enable IMAP radio button in order enable setting.

vi) There are some more option that can be use to setup the way how email downloads to your client mail box. Setup accordingly & then click save changes.
Setting For Email Client
i) Login in to your Google Account page.
ii) Select Security option.

iii) Open App password option.

iv) In select app option select mail.

v) And in select device option select your device type e.g Windows, Mac, iPhone etc. If your device type not found , select other and type your device , OS type.


vii) Now open your email client e.g Thunderbird or Outlook ( 2010 ,2013, 2016, 360). Here I am giving you a demonstrate on Thunderbird application
viii) You will be prompted to configure your email account. if not prompted select email option.

viii) Enter your name , email ID & password. but instead of your regular gmail password, paste the password which you earlier copied into clipboard or saved somewhere.

ix) Now click on advance option & fill other options as shown in below picture for IMAP configuration.

x) Click on retest button first. This will test your configuration by communicating with the service itself.
xi) If work fine , click done. You have successfully configured your Gmail account on Thunderbird mail client.

That's All.
If You Like , Please Share This Post With Your Friend 😃


0 Comments