


Hello Geeks 👋 , In this post I will show you how you can install Linux with complete GUI desktop environment in any capable Android smartphone. Here the term capable does not mean to some specific type of Android smartphone It mean that your Android smartphone should have enough RAM & Storage and minimum required Android version etc. For this make happen you should have to install some android applications which are easily available on Google Play Store. Also the process of installing Linux is simple as you can think 👀. So lets start ...
Video Link :
Before going further , Please install required application from the google play store for this process make happen. Below are the play store link of those applications.
1) Termux
2) AnLinux
3) VNC Viewer
Posts You May Like : Free Programming Tutorials
Step 1 : Install Termux application.
If you don't know about Termux app then don't worry , Its a simple Linux console emulator application which create a virtual Linux environment in Android device. You can run any Linux commands in its terminal interface. The great thing is that you can install the Linux packages in it and it can execute those Linux programs. It has it own package management system. If you don't find any command in Termux console app you can install it with the default package manager commands.

Step 2 : Install the AnLinux application.
a) After install AnLinux , Open it.
b) In dashboard, Select CHOOSE button.

c) You will get a list of top Linux distros. Select your favorite one. (if you are beginner / New to Linux then Ubuntu is recommended ) , then click ok. List of available Linux distro are Ubuntu, Debian, Kali, BackBox, Fedora, CentOS, openSUSE, Arch Linux, Black Arch, Alpine .
d) In 2nd step, copy the given command from the COPY button.
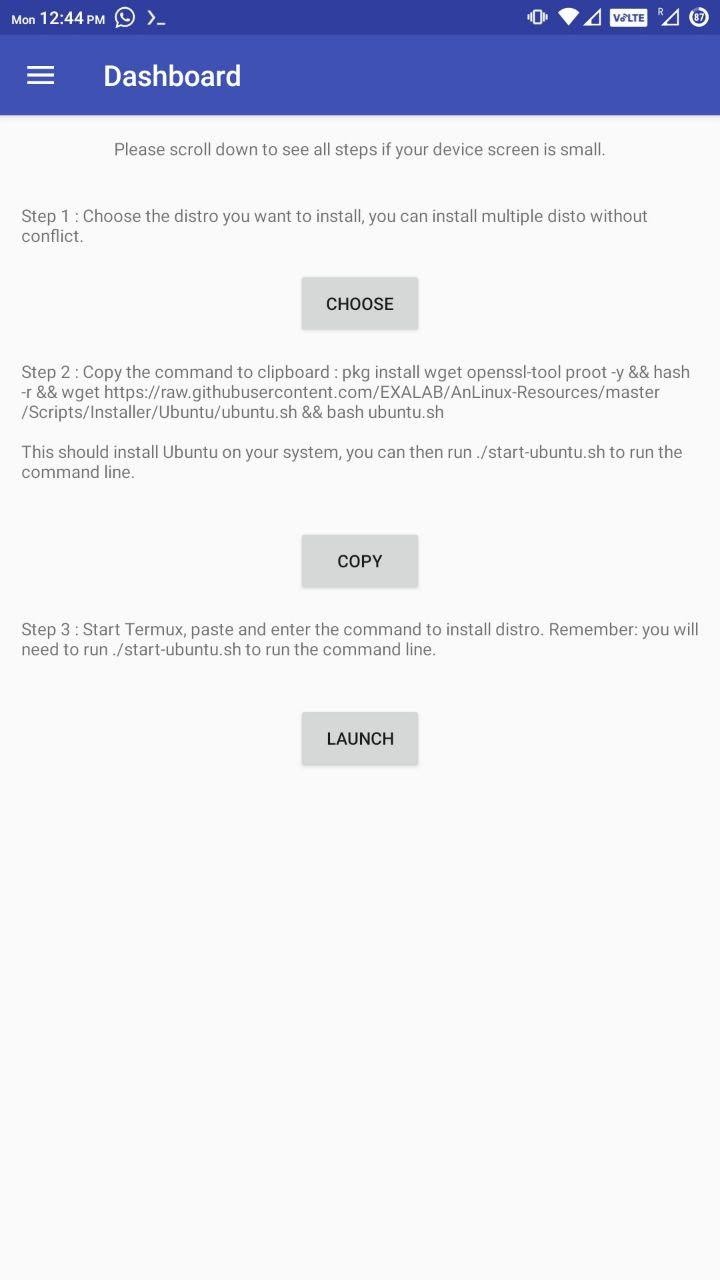
e) Now Open Termux app , paste the copied command in the Termux terminal and press enter key ↵ from keypad.

f) Your Ubuntu OS installation will begin. Please wait until the process complete.

g) Once process will completed successfully , Your Linux distro OS has been installed.
h) To run Linux distro you have to run the related OS script which was mentioned in the last after process completed e.g.
For Ubuntu
./start-ubuntu.sh

Note : These commands are also mentioned in the AnLinux >Dashboard > Step 3 option.
i) Once you run the .sh script , You will inside the your Linux distro. To check your Linux version info. run below command
cat /etc/os-release
This will show you the OS version and basic info.

Step 3 : Now again open AnLinux application.
a) From menu options > select Setup SSH option.

b) Follow the instruction to install the ssh server in your Linux distro. remember that you have to install the ssh server inside your Linux distro not in your Termux console app.

Step 4 : Now again open AnLinux application.
a) From main menu > select Desktop Environment Option > Choose your Linux distro > Choose your favorite Desktop Environment > Copy the command > Paste inside the Linux distro
b) Follow the instructions to install the Desktop Environment in your Linux distro.

Note : during installation of Desktop Environment , You might be prompted for Display Manager , choose accordingly. lightdm display manager should be prefer

c) At last you will be asked to enter the password for your vncserver session . Set a password for your vncserver ( one time). Also an IP address will be given which you will use to connect to your Linux system via VNC viewer In most cases it should be local loopback address (127.0.0.1).

d) Use command vncserver -start and vncserver -stop , to start or stop vncserver service accordingly .

Step 5 : Now open VNC Viewer application.
a) Enter the IP address (127.0.0.1) and port 5901.

b) You will be asked for password which you have setup for your VNC Server. enter that password.

c) If you have perform all steps without getting any error , you will be able to access your Linux system with GUI. If you get any error like "connection refuse" , just stop your VNC server service and start again. And try again to connect.

Great 💥 ! You have successfully install Linux with GUI in your Android smartphone without root your device.
Please share this post with your friends if you like it 😀


0 Comments